TABLE OF CONTENTS
Experience the Future of Speech Recognition Today
Try Vatis now, no credit card required.
You finish the cut, send a review file, and then the caption pass blows up your schedule. Names are wrong. Timing feels robotic. A lower third sits exactly where the subtitle line wants to live. Then the client asks for a second language version and a clean SRT for upload.
That’s the reason premiere pro subtitles deserve a workflow, not a last-minute checkbox.
Premiere Pro has come a long way. Adobe moved from basic manual subtitle imports before 2020 to integrated AI captioning by 2023, in response to a 300% surge in demand for accessible video and regulations that pushed broadcasters toward 95%+ caption accuracy for US TV and streaming. Viewer behavior pushed the same direction. 75% of Gen Z prefer captioned content, and subtitled videos see 4x higher completion rates according to Rev’s overview of Premiere Pro subtitle workflows.
Why Your Subtitle Workflow Needs an Upgrade
The built-in tools are useful, but they don’t remove judgment. They shift where the work happens.
If your footage is clean, your speakers are clear, and the turnaround is tight, Premiere’s native speech-to-text can get you moving fast. If the audio is messy, the language mix is wider than standard US English, or the captions have to survive legal review, broadcast delivery, or multilingual publishing, the native route often creates a second job: fixing what the AI guessed.
That’s where most editors lose time. Not in generating subtitles, but in cleaning bad subtitles.
What changed inside Premiere
Adobe Premiere Pro 23.1 introduced auto-transcription directly in the timeline workflow, letting editors generate an editable transcript and then use Create Captions from Transcript to build a subtitle track. In practice, that changed captioning from a separate prep task into part of editorial. User tutorials around that release describe up to 50% efficiency gains for dialogue-heavy post work when compared with manual typing, as covered in this Premiere Pro auto-caption walkthrough.
That convenience matters. It’s the difference between rough captions being available during edit review versus after picture lock.
Good enough versus professional
A workable subtitle process usually has two lanes:
- Native lane: Fast, convenient, fully inside Premiere. Good for internal review cuts, social edits, rough approvals, and projects with clean dialogue.
- Imported file lane: Generate a vetted SRT or VTT outside Premiere, then import and style inside the edit. Better when wording, sync, multilingual support, or consistency matter.
Practical rule: If you’re still correcting names, punctuation, and timing one caption at a time on deadline, your workflow is too fragile.
The professional difference isn’t whether captions exist. It’s whether they’re accurate, readable, on-brand, and export cleanly for the platform you have to deliver to.
Choosing Your Path Native Transcription vs Imported SRT Files
The first decision changes everything after it. Don’t open the Text panel and click around until you know which job you’re solving.
If you need a fast draft inside one project, native transcription is usually fine. If you need approved language, multilingual precision, or a file that can move between systems without surprise edits, start with an external subtitle file and bring it in.
When native transcription works
Premiere’s native tool is strongest when the editor wants everything in one place. You transcribe the sequence, review the transcript, generate captions, and tweak timing without leaving the timeline.
That’s a sensible choice for:
- Internal approvals: Stakeholders can read what’s being said without waiting on a formal subtitle pass.
- Clean interview edits: One or two speakers, controlled recording, minimal overlap.
- Quick social versions: Especially when the subtitles are serving readability more than regulatory or legal precision.
When imported subtitle files win
Language complexity changes the equation fast. Adobe’s native transcription can sit around ~85% accuracy in multilingual or accented situations, while complaints about non-English errors are 40% higher in user discussions. Specialized services are cited at 98%+ multilingual accuracy in the same context, which is why this route matters for global newsrooms, legal review, and other precision-first work, as noted in this multilingual subtitle workflow analysis.
That doesn’t just mean fewer typos. It means fewer timing corrections, fewer client disputes over wording, and fewer export issues when multiple teams touch the same file.
Side by side comparison
| Feature | Premiere Pro Native Transcription | Vatis Tech SRT/VTT Import |
|---|---|---|
| Setup speed | Fast if you’re already editing in Premiere | Fast once transcript is generated and exported |
| Best use case | Rough cuts, internal review, clean single-language edits | Final delivery, multilingual projects, accuracy-sensitive work |
| Accuracy trade-off | Can be workable on clean audio, but drops on accented or non-English speech | Better fit when exact wording matters and external review is needed |
| Editing style | Edit transcript and captions directly in Text panel | Edit subtitle file first, then import a cleaner track |
| Collaboration | More tied to the Premiere project | Easier to hand off approved SRT/VTT between teams |
| Rendering flexibility | Native caption styling is quick, but not always visually clean | Imported files pair well with alternative styling workflows |
| Risk points | More cleanup inside timeline | More prep before import, less cleanup after |
| Ideal editor mindset | “I need captions now.” | “I need captions I won’t have to redo.” |
A practical decision filter
Use native transcription if all three are true:
- The audio is clean.
- The language is straightforward.
- You can tolerate editorial cleanup in the timeline.
Use imported SRT or VTT if any of these show up:
- multiple languages
- heavily accented speech
- client-approved wording
- legal or compliance review
- a requirement to reuse subtitles across edits or platforms
One small prep step helps either route: clean audio first. If the source track is buried under room tone, crosstalk, or camera noise, pull the dialogue out before you ask any speech engine to interpret it. A quick guide on how to extract the sound from a video is useful when you want to prep isolated audio before transcription.
Imported subtitles aren’t slower if they remove a full round of corrections later.
The Native Workflow Generating Captions Inside Premiere Pro
You finish a cut at 6:40 p.m., the upload goes live at 8, and captions still need to happen inside the same project. That is the native Premiere scenario. For short turnaround work, it gets the job done fast, as long as the audio is clean and the language is predictable.
Adobe’s current caption workflow is straightforward. Premiere transcribes the sequence, lets you edit the transcript in the Text panel, and converts that transcript into a subtitle track. The speed advantage is real because transcription, timing, and editorial changes stay in one place.
Start with audio prep
Premiere will transcribe whatever the sequence feeds it. If music, room tone, camera scratch audio, and overlapping mics are all active, the transcript quality drops before you touch a single caption setting.
I prep the sequence first, not the captions. That means muting temp tracks, keeping only the mic I want analyzed, and running a quick dialogue cleanup pass if the source is rough. Even small fixes help because transcription errors tend to cluster around the same problems: noise, low dialogue level, crosstalk, and clipped words.
Use this checklist before you hit Transcribe Sequence:
- Mute irrelevant tracks: temp music, duplicate mics, reference tracks, and scratch narration
- Clean dialogue first: reduce steady noise and make speech easier to isolate
- Transcribe the correct cut: avoid building captions from an outdated assembly
- Confirm language settings: a wrong language choice wastes time fast
If the project includes multiple languages or accented speakers, this is usually where I stop trusting the native route as the primary transcription pass. Premiere can still be the finishing environment, but the transcript itself is often faster to create with a dedicated speech-to-text API for subtitle generation and then bring back into the edit as a subtitle file.
Generate the transcript
Open Window > Text, select the sequence, and choose Transcribe Sequence. Set the spoken language, then enable speaker labeling if you are cutting interviews, documentaries, or any piece where speaker changes affect readability.
For straightforward studio dialogue, Premiere is usually accurate enough to get a solid first draft. For noisier material, the transcript becomes a correction job. That trade-off matters. If you spend more time fixing names, punctuation, and broken phrases than you would have spent importing a cleaner SRT, the native speed advantage disappears.
Clean the transcript before making captions
This is the part many quick tutorials skip.
Do not convert the transcript to captions the second it appears. Edit the transcript first, while you can still correct repeated errors at the source. Product names, surnames, acronyms, and place names should be fixed before Premiere splits them into dozens of caption segments. The same applies to punctuation. A missing comma or period does not just affect grammar. It changes reading rhythm and line breaks.
A few edits save a lot of cleanup later:
- Fix repeated terms first: brand names, guest names, technical terms
- Remove filler selectively: keep it for verbatim compliance, cut it for viewer readability
- Correct punctuation manually: automated punctuation is often serviceable, rarely polished
- Check speaker labels: helpful in panel edits, distracting in one-person content
I also read the transcript once at normal playback speed before generating captions. If a sentence reads awkwardly at that stage, it will usually read worse once it is broken across timed subtitle cards.
If you want a separate perspective on adding captions within a video editor, that resource is helpful for comparing how caption editing principles carry across tools even though the interface differs.
Turn transcript into captions
After the transcript is cleaned up, use Create Captions from Transcript in the Captions tab. Premiere will suggest line length, duration, and segmentation settings. Those defaults are usable, but they are not editorial decisions.
I check three things right away:
Line breaks
Break by phrase and meaning, not by character count alone.Timing
Auto timing is often close, but spoken cadence still needs hand adjustment around pauses, interruptions, and sentence ends.On-screen conflicts
Lower thirds, burnt-in graphics, and product UI often compete with bottom-center subtitles.
This is also where Premiere’s text rendering limitations start to show. Native caption styling is fine for basic delivery, but the visual result can feel stiff, especially if the project needs branded subtitles, better box treatment, or cleaner multilingual typography. Editors who work on social, promo, and YouTube content run into that quickly.
Edit on the timeline, with realistic expectations
Premiere’s best native advantage is proximity. Transcript edits, subtitle timing, and sequence changes all live in the same project, so it works well for interviews, news cuts, and revisions where dialogue is still changing.
The weak point is cumulative cleanup. One wrong transcript line is easy to fix. Fifty repeated errors, mixed languages, or poor speaker separation turn the Text panel into repair work. That is why I treat native Premiere captions as a fast editorial tool, not the default answer for every subtitle job.
For clean English dialogue on a deadline, stay native.
For multilingual projects, client-approved wording, or subtitle-heavy delivery, use Premiere for timing and finishing, and generate the subtitle file elsewhere first. That split usually produces better text, fewer corrections, and fewer surprises once styling starts.
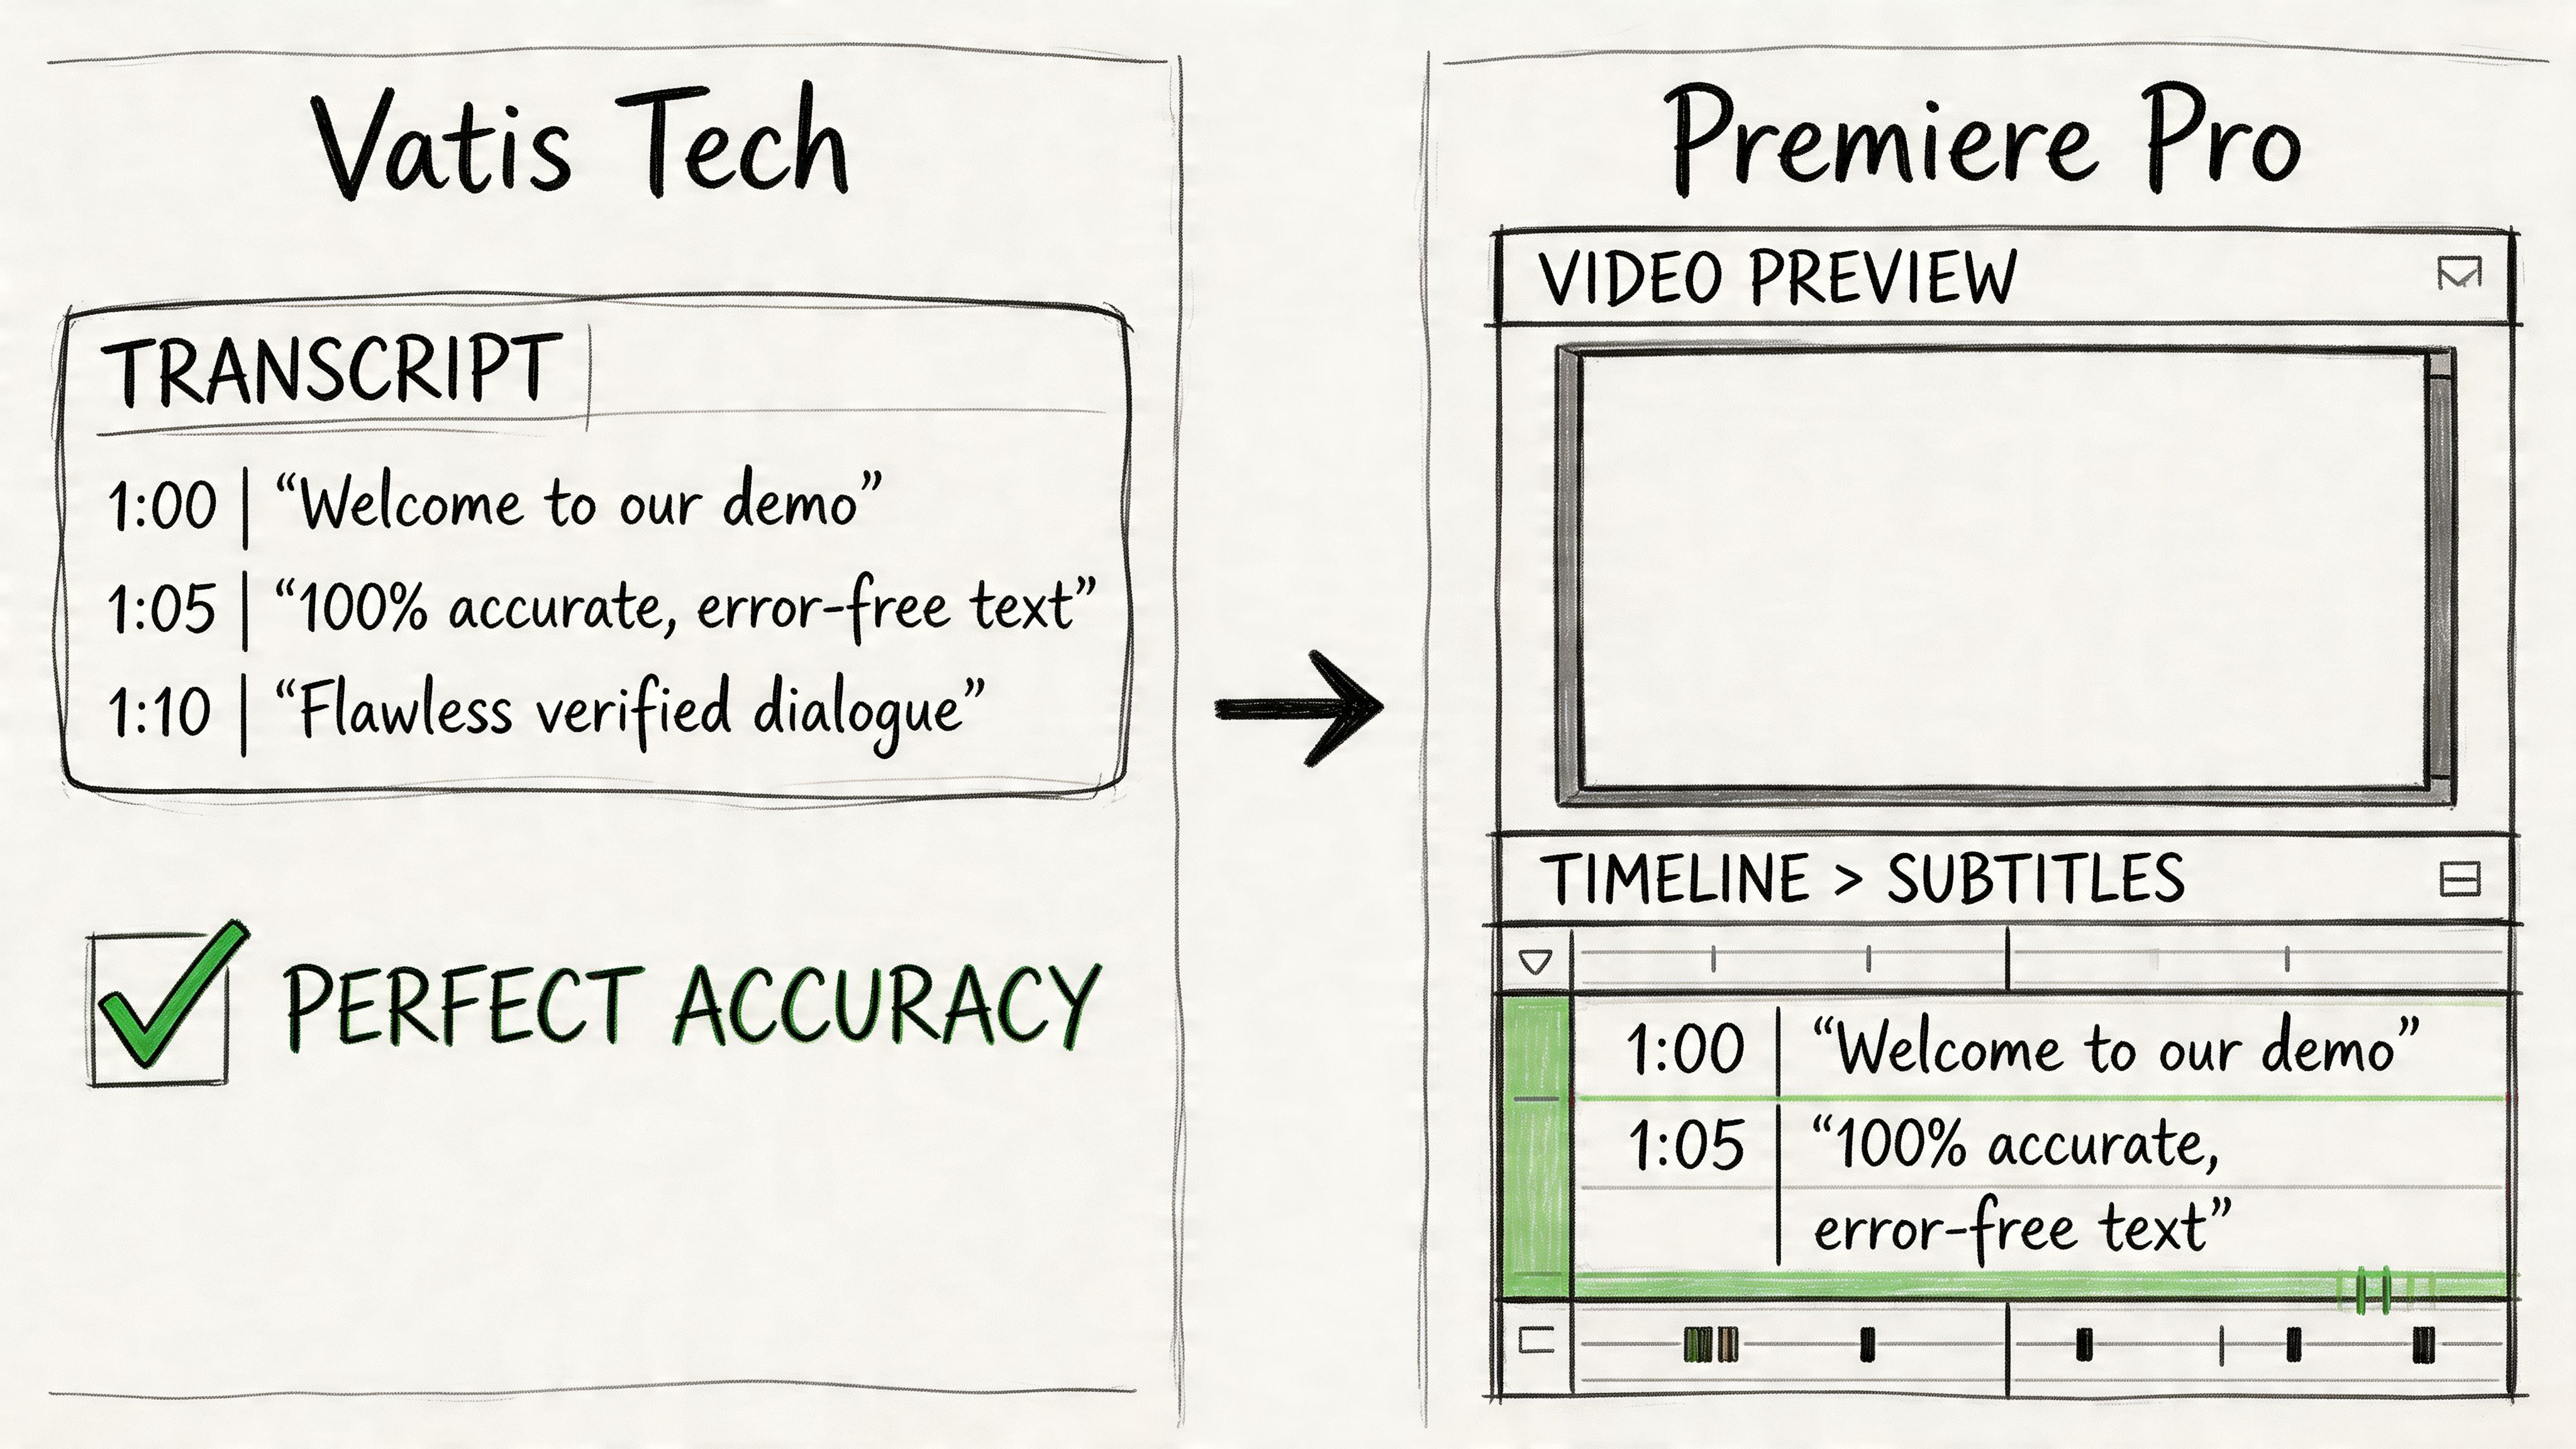
The Pro Workflow Using Vatis Tech for Flawless Subtitles
There’s a point where “fix it in the Text panel” stops being efficient.
If the project has multilingual dialogue, difficult accents, legal sensitivity, or a client who will compare every line against a script, I’d rather import a vetted subtitle file than debug transcription errors on the timeline. The reason is simple: Premiere is a strong editor, but it isn’t always the place where transcription should begin.
Why external transcription changes the workload
The hidden cost of native subtitles is correction time. A cleaner subtitle file shifts work earlier, where it’s easier to review wording and timing before styling starts.
The workflow is straightforward:
- upload final media or extracted audio
- select the target language
- review transcript and timestamps
- export SRT or VTT
- import the file into Premiere and style it there
Where this route saves real time
For teams handling recurring subtitle loads, the benefit is consistency. Editors stop spending the first pass correcting the same class of mistakes and can focus on placement, style, and delivery.
One option in that category is Vatis Tech’s speech-to-text API, which is built for generating editable transcripts and subtitle exports such as SRT and VTT. In the publisher background provided for this article, Vatis Tech is described as supporting 50+ languages and 98%+ accuracy, along with timestamps and speaker diarization. In practice, that kind of output is most useful when Premiere’s native transcript would become an editing bottleneck.
Importing the file into Premiere
Once you have the subtitle file, bring it into the project like any other media asset. Then drag it onto the sequence.
Premiere creates a caption track from the imported SRT or VTT. From there, you’re not fighting recognition errors as much. You’re mostly checking sync, trimming display duration, and handling visual presentation.
That changes the tone of the subtitle pass. It becomes an editorial polish task instead of a text rescue task.
If the transcript already matches what the speaker said, the subtitle session gets dramatically simpler.
Best fit projects
I’d lean toward the imported-file route for:
- broadcast packages
- court or deposition edits
- healthcare explainers
- multilingual newsroom clips
- corporate training where exact wording matters
The imported workflow also travels better across teams. A producer can approve text outside Premiere, an editor can style it inside Premiere, and a platform team can upload the sidecar file later without recreating anything.
Advanced Styling Beyond the Default Look
A technically correct subtitle can still look cheap.
Often, many guides stop too early. They explain how to create captions, then assume the default appearance is fine. It often isn’t. Editors run into soft edges, harsh rasterization, awkward default placement, and subtitles that fall apart against bright or busy footage.
A frequent complaint on Adobe Community forums is poor native caption rendering with jagged or “hard edges,” and the issue is often tied to how Premiere rasterizes caption text. Workarounds commonly involve upgrading captions to graphics templates or relying on externally generated SRT files when clean visual output matters, as discussed in this caption rendering quality breakdown.
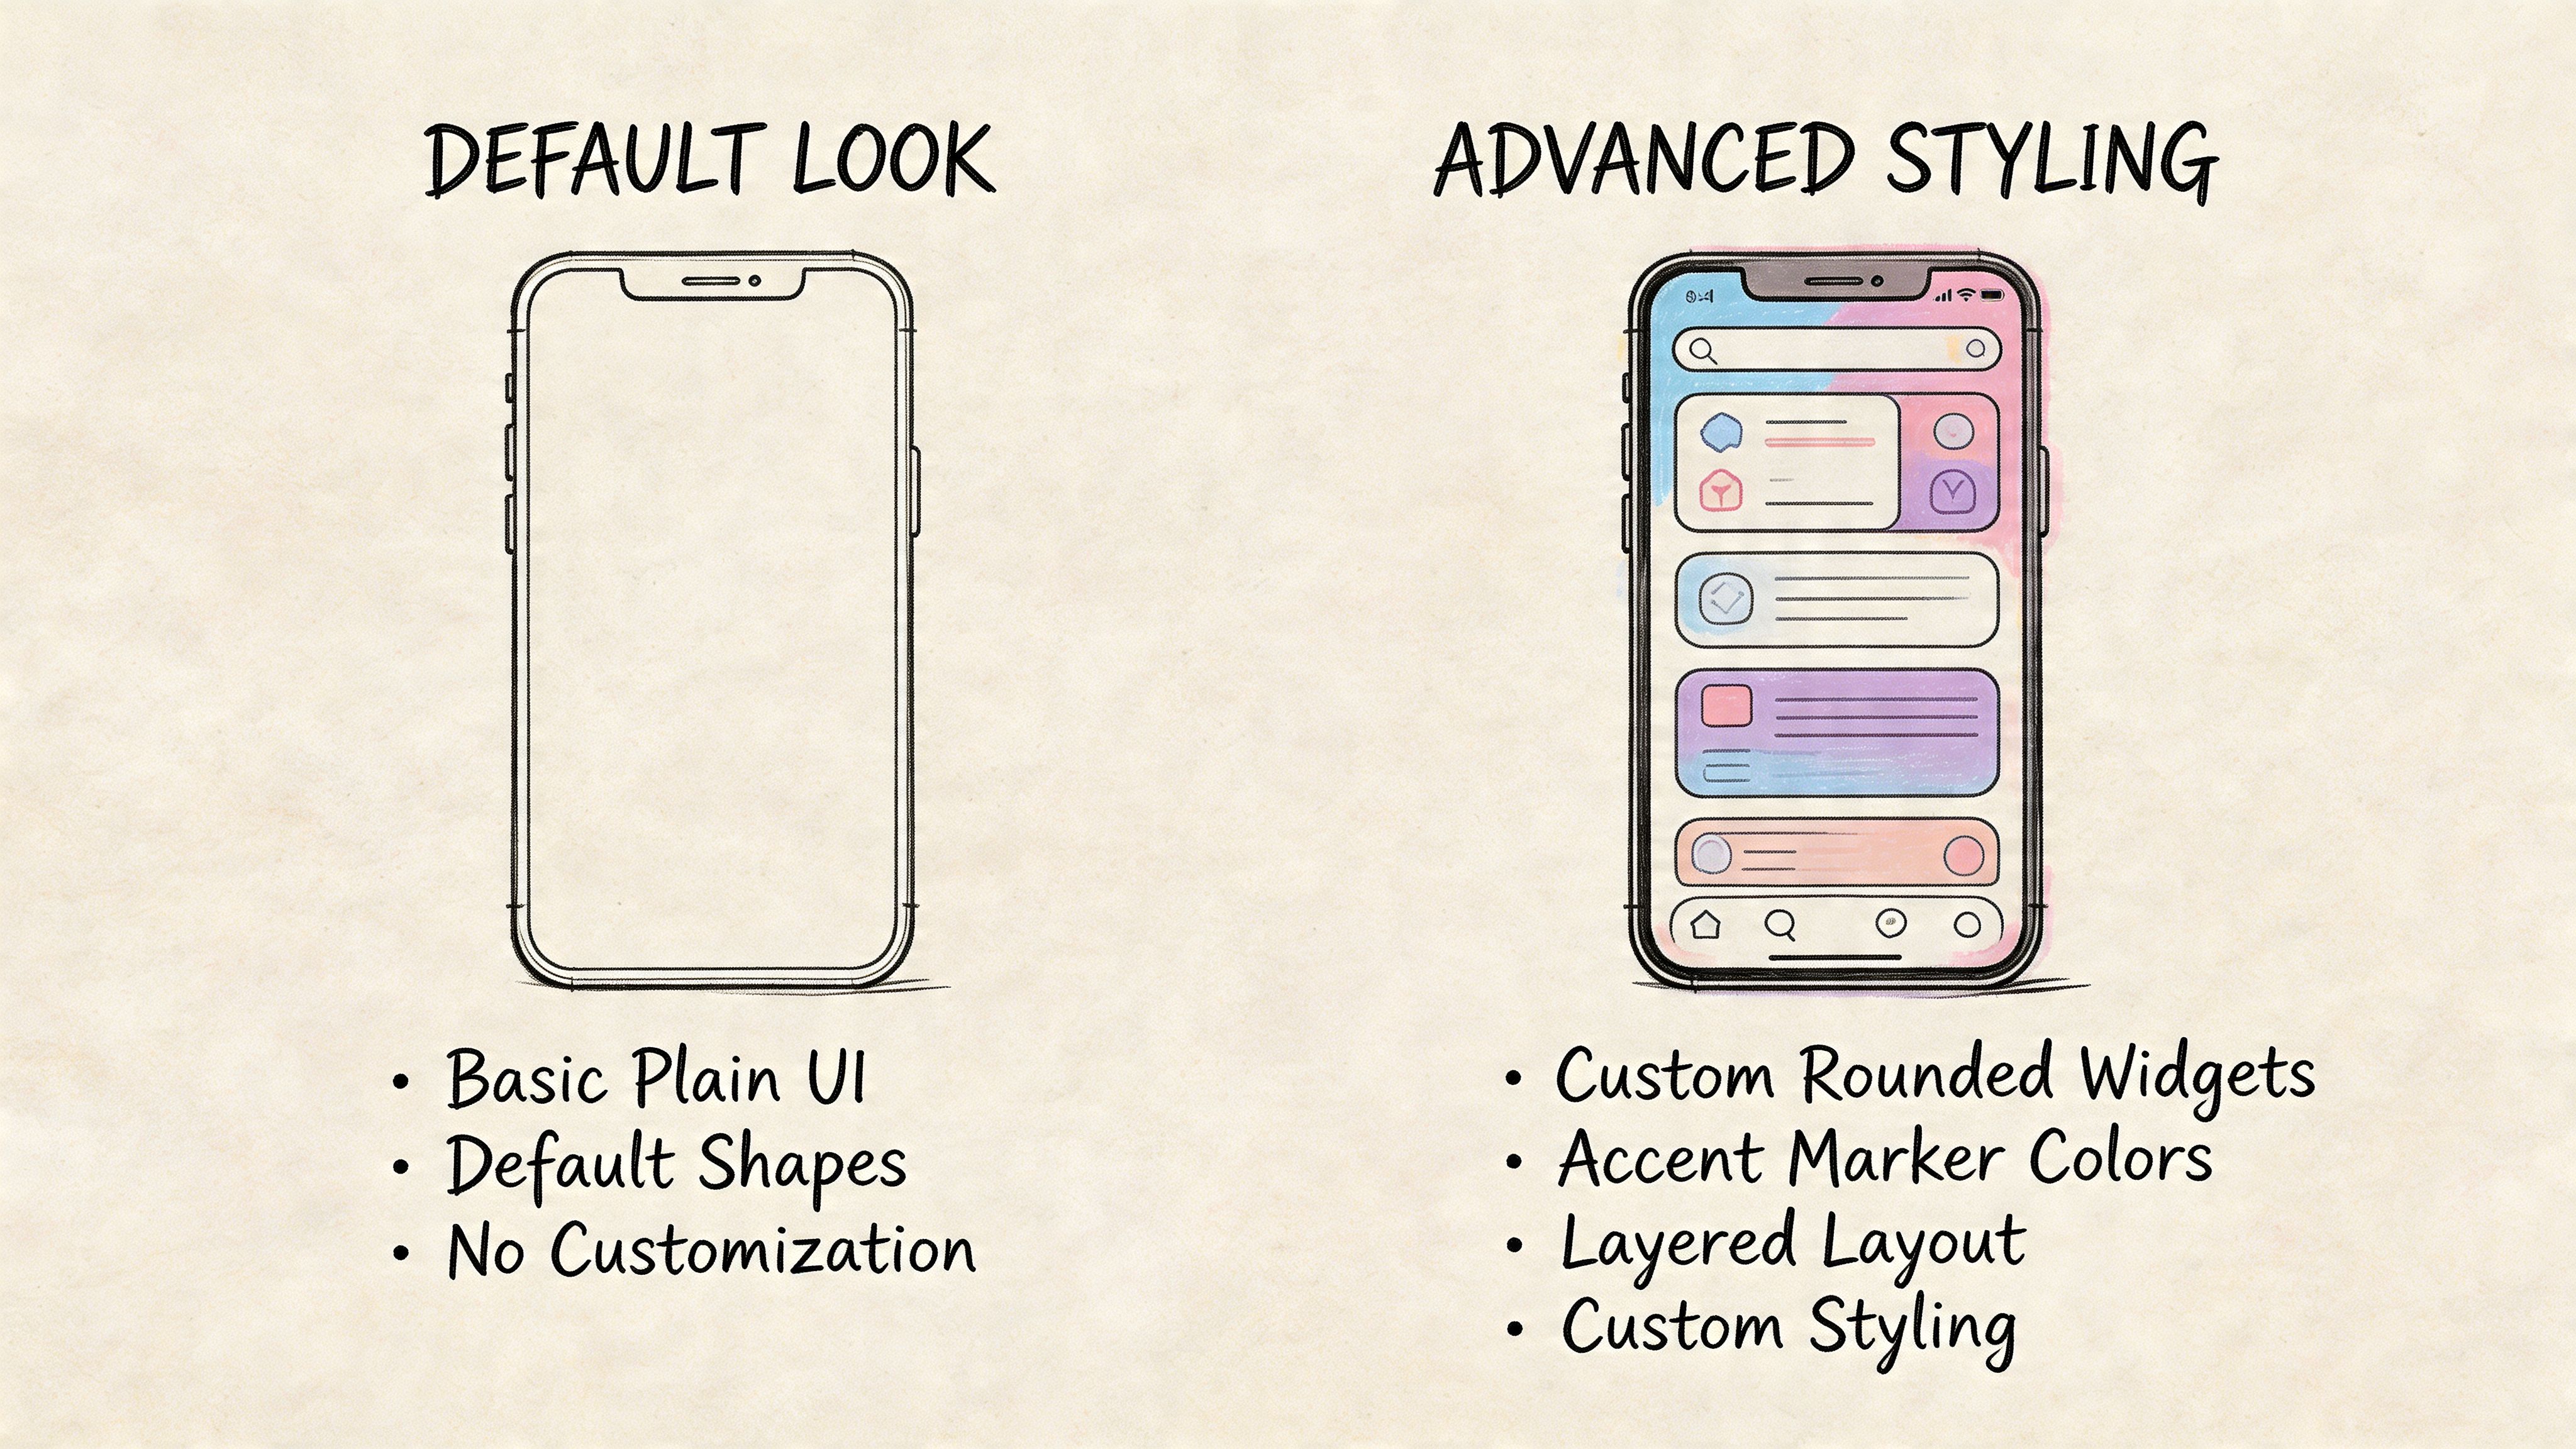
Build for readability first
Start with legibility, not branding. If the subtitle can’t survive mobile playback over mixed footage, the style isn’t working.
My default checks are simple:
- Use a clean sans-serif font: Decorative fonts die fast in small captions.
- Add separation from the image: A background box, shadow, or stroke matters more than a subtle font choice.
- Raise the baseline when needed: Don’t let subtitles sit under platform UI or over lower thirds.
- Keep line breaks natural: A good break supports speech rhythm and reading speed.
When to convert captions to graphics
Native captions are efficient because they remain editable as subtitles. But if the output looks rough, converting selected captions to graphics can solve visual quality problems.
That trade-off matters:
| Styling approach | Best for | Limitation |
|---|---|---|
| Native caption track | Fast revisions, sidecar export, accessibility workflows | Less control over fine visual quality |
| Graphics-based subtitles | Branded open captions, polished social clips, cleaner rendering | Harder to manage as true subtitle data |
| Imported SRT plus custom styling | Clean text source with flexible finishing | Still requires final design decisions inside edit |
A practical styling pass
When I’m styling premiere pro subtitles for final delivery, I don’t touch every line individually unless there’s a strong reason. I set a track style, review a few difficult shots, and only override placement where the frame demands it.
That usually means:
- establish one default look
- test it against bright and dark footage
- check a phone-sized preview
- move captions up when lower-thirds appear
- convert to graphics only when native rendering becomes the weak point
Captions should look intentional. If they feel like a software overlay, viewers notice even when they can’t explain why.
Don’t over-style subtitles
A lot of editors make the opposite mistake after escaping the default look. They add too much. Heavy animation, constant color changes, and emphasized words on every line can make the video harder to watch.
For most professional work, the subtitle style should do three things well:
- stay readable
- stay consistent
- stay out of the way
If you want expressive kinetic text, build that as a design layer. Don’t make every subtitle behave like motion graphics.
Exporting Subtitles and Troubleshooting Common Problems
Export is where a subtitle workflow proves itself.
A file can look perfect in the Premiere timeline and still fail at delivery. I see the same problems over and over: the wrong export format, timing drift after a late picture change, broken accented characters in imported subtitle files, and captions sitting too low for the player UI. Premiere can get a project over the line, but once you are handling multiple languages or platform-specific handoffs, its weak spots show up fast. That is usually the point where a cleaner source file from Vatis Tech saves time, because you are fixing delivery details instead of repairing transcript errors and line breaks at the same time.
Export based on the destination
The subtitle format should match the platform, not your editing habit.
- Burned-in captions: Use these for social cuts, paid placements, or any file that needs visible text no matter where it gets reposted.
- SRT sidecar: Use this for YouTube, Vimeo, review platforms, and client handoffs where the text may need revisions after picture lock.
- VTT sidecar: Use this in web video workflows that expect WebVTT.
- Embedded captions such as CEA-608: Use these only when the delivery spec asks for caption data inside the master file.
My rule is simple. If the platform supports sidecar captions and the client may request text changes later, I export SRT. If the video is going to circulate as a standalone asset and nobody controls the player, I burn captions into the picture. If broadcast or distribution gives a spec sheet, I follow the spec exactly.
Problems that usually appear at export
Sync drift over a long timeline
If subtitles start in sync and slip later, do not start nudging individual cues. Check the sequence frame rate, the source file used for transcription, and whether the current cut still matches that source. A five-second trim at the top, a replaced intro, or a retimed interview segment can shift the whole subtitle file.
I usually check three points: near the start, around the middle, and close to the end. If each point is off by a different amount, the issue is timing base or edit version mismatch.
This is also where Vatis Tech has an advantage over Premiere’s native tools. If the cut changed after transcription, retiming or regenerating from the updated media is often faster than manually repairing dozens of drifting caption blocks in Premiere.
Garbled characters in foreign-language subtitles
This one matters more than a lot of generic Premiere guides admit. Multilingual subtitle files often break on import because of encoding, not because the translation is wrong.
If Arabic, Japanese, French accents, or other non-English characters import as symbols or junk text, resave the file as UTF-8 before bringing it into Premiere. I check this early on any translated SRT that came from email, a PM, or an external language vendor.
A specialized service is usually safer here. Premiere is fine for placing and exporting subtitle files, but it is not where I want to discover that a multilingual delivery has character errors.
Captions were approved, then the cut changed
This happens constantly in client work. Someone adds a slate, trims the cold open, swaps in a faster take, or shortens the ending after captions were already signed off.
At that point, the question is not "how do I patch this in Premiere?" The pertinent question is whether patching is still efficient. For a few seconds of change, a retime may be enough. For a structural edit, regenerate the subtitle file against the new cut. If you need a quick way to verify where timing starts to drift, this guide to adding accurate timestamps to video is useful during QC.
Speed changes make subtitles unreadable
Editors get this request late all the time: shave time off the piece by speeding up a section. The picture may still work. The subtitles often do not. Reading speed gets cramped, cue changes feel abrupt, and line breaks stop matching speech naturally.
Before committing to a full subtitle rebuild, test the pacing with a free video speed changer. It is a quick way to see whether the runtime change still leaves enough room for readable captions.
Subtitles look fine in Premiere, rough in export
Native captions can render less cleanly than graphics, especially if you are picky about text edges, positioning, or branded styling. If the exported result looks softer than the rest of your on-screen typography, compare two outputs: a caption-track export and a graphics-based export. The extra step is worth it on premium social, brand films, and ad creative where text quality is part of the design.
That trade-off matters. Premiere’s native caption workflow is faster for revisions and sidecar delivery. Graphics usually look better. Imported, well-structured files from Vatis Tech give you a better starting point for both paths because the timing and text quality are already under control.
Good subtitle delivery is not just getting a file out of Premiere. It is choosing the export that survives the real handoff without creating another round of fixes.
Frequently Asked Questions about Premiere Pro Subtitles
A few issues come up repeatedly once the main workflow is in place.
| Question | Answer |
|---|---|
| Should I use open captions or closed captions? | Use open captions when you need guaranteed visibility in the video file itself. Use closed captions or sidecar subtitle files when the platform supports viewer control and future text revisions. |
| What’s the safest subtitle file to export from Premiere? | In most editorial workflows, SRT is the most practical sidecar format because it travels well between tools and platforms. |
| Can Premiere Pro handle multilingual subtitle projects by itself? | It can, but the workload grows fast once accuracy drops and review becomes language-specific. For multilingual projects, many teams create or validate the subtitle file before import, then use Premiere mainly for sync checks and styling. |
| Why do my subtitles look softer than other on-screen text? | Native caption rendering can look rough depending on the workflow and output. If visual quality is the issue, test graphics-based captions or imported subtitle workflows and compare exports before final delivery. |
| When should I add speaker labels? | Add them when viewers may not know who is speaking, especially in interviews, panels, off-camera speech, or accessibility-focused deliverables. Skip them when they create clutter and the speaker is obvious on screen. |
| What’s the cleanest way to work with clients on subtitle approval? | Approve wording outside the timeline when possible. Once the text is signed off, import it and handle timing and styling in Premiere. That avoids last-minute text disputes during finishing. |
If your current subtitle pass still depends on manual cleanup inside the timeline, it’s worth testing a cleaner upstream process. Vatis Tech is one option for generating editable transcripts and subtitle exports that can slot into Premiere Pro when accuracy, multilingual support, or review-friendly handoff matters more than an all-in-one native workflow.