TABLE OF CONTENTS
Experience the Future of Speech Recognition Today
Try Vatis now, no credit card required.
Speech to text, or speech recognition, is a technology that was first used in the 1950s, but only in the recent years it has gained popularity. The name says it all, speech to text refers to a technology that receives and audio file, or a video file from which the audio is extracted, and gives back, in text, the words from human voices in that audio. This means that a speech to text technology can be used to automatically transcribe a media file, and thus, help humans in manual transcription.
In this tutorial, we will cover three ways you can automatically transcribe your media files, using the Vatis Tech speech to text technology.
Prerequisites
First of all, if you do not have any, you will have to create a free account on the Vatis Tech website here.
A free account on Vatis Tech comes with one free hour of transcription. Meaning, you can use the Vatis Tech speech to text with an audio or video file of 60 minutes, or multiple audio files that amount to 60 minutes.
When you first create your account, you will be redirected to your account, where you will be prompted with a small tutorial on how the speech to text technology with one example file.
You can choose between media files in Romanian, or in English.
For the time being, you can skip them.
If you already have an account, you will need to log into it here, if not already.
How to use Vatis Tech speech to text
We will go through three methods of doing this:
- Transcribe in app with a click of a button
- Transcribe in app with dragging your files
- Transcribe using Vatis Tech API endpoints [For developers]
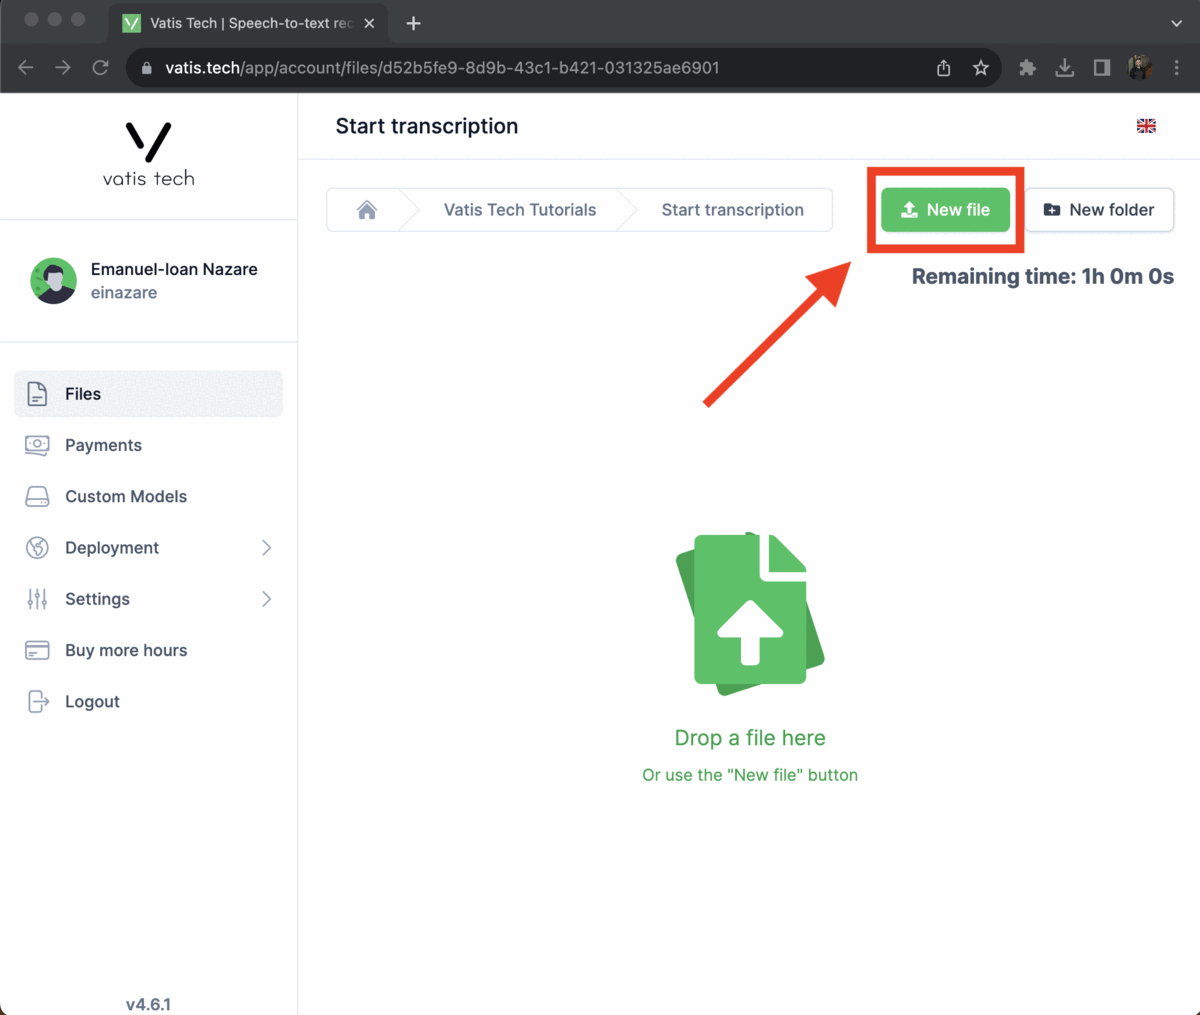
1. Transcribe in app with a click of a button
After you have logged in your account, in the upper right corner of your screen, you should click on a green button, 🔼 New file .
You will be prompted with the browsers file selection pop-up.
Select as many media files you want to automatically transcribe and continue. To continue, depending on your browser and/or language, you should have a button in the selection pop-up named Open, or Select. If you have any issues here, feel free to contact me.
Once you have selected the files you want to transcribe, you will be prompted with the transcription pop-up.In this transcription pop-up you need to:
- Select the language of your files - the speech language
- Select the AI model you would like to use
Our models have names such as General, Legal, Medical, etc. depending on the type of speech, you should choose accordingly
The General model is the most powerful, and is composed by all the other models, so we suggest you use this one
- Depending on the langue and model, you might have a few more other options that you can choose for your files:
Post-processing: whether you would like your transcription to have Punctuation, Capitalisation, Numerals Conversion, Entities Recognition and not have Disfluencies
Here is an example of a transcript without Post-processing: i would like ah to go on the thirty first of october in europe
And here is the same transcript with Post-processing: I would like to go on 31st of October in Europe.
Find and replace: this is an advanced filtering, where you can specify our speech to text technology how to change some words or phrases in your transcripts. For example, if in your transcripts our speech to text technology outputs SpongeBob as Sponge Bob, or SpongeBwab, or Sponge Bwab, etc., you could specify this. You can set your find and replace tags here, on some languages and models.
Speakers Diarization: you can switch this option if you would like the speech to text technology to try and split your output transcript in paragraphs by speakers.
Multiple Channels: if you audio has multiple channels, you can switch this, and the output transcript will be split in paragraphs by channels. Note that you can only use one of this option, or the Speakers Diarization one.
- Press the green Upload button, and wait for the files to be uploaded and the automated transcription to start.
- Once the transcript is done, you will be able to click on it in the list, and open our editor to start editing and checking your transcript along side your audio or video file. We will cover the editor in a later blog post.
Second step: choose the files you want to automatically transcribe and confirm
Third step: configure your transcription and press the Upload button
Last step: wait for the files to get uploaded and automatically transcribed, and press on them to check the transcript
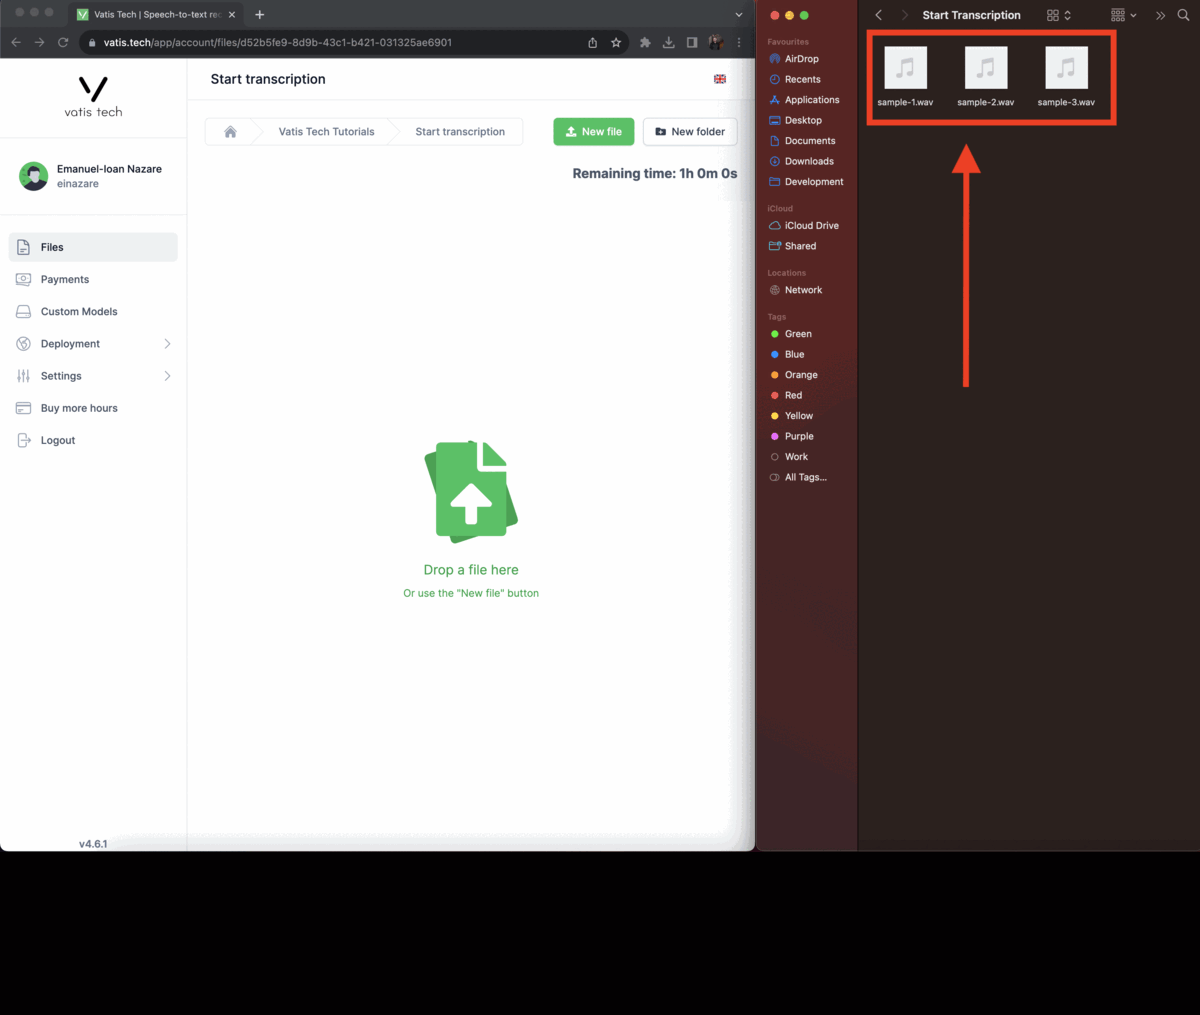
2. Transcribe in app with dragging your files
This method is almost the same as the previous one, but the difference is that, instead of clicking a button, you just need to drag and drop your files directly in your Vatis Tech files list.
Once you do that, you will be prompted with the transcription modal.
Second step: configure your transcription and press the Upload button
Last step: wait for the files to get uploaded and automatically transcribed, and press on them to check the transcript
3. Transcribe using Vatis Tech API endpoints [For developers]
Vatis Tech offers three ways of automatically transcribing your files using our APIs:
- You can upload a file to our GCS and then ask to start the transcription for that file
- You can send a public link of your file and let us do the downloading and starting the transcription
- You can directly upload your file through our API and the transcription will start when the file is uploaded
NOTE: If you upload multiple files, some files may be queued and will start the transcription once the first files have been transcribed. If you have any question about this, please let me know at emanuel@vatis.tech.
In any case of the above, you will first need to get your API key from here.
Upload to GCS and start the transcript
First step is to get your signed GCS url by doing the following HTTP request:
NOTE! the query param name needs to specified and need to be the actual name of your file.
You will get a response that will look something like:
The second thing, will be to upload your file with a POST request to the uploadUrl from the previous GET:
And send the file as a form body to the request. If you need more info, please check the official docs of Google.
Next, you need to make the following request to start the transcription process:
This request has the following Query Parameters:
And the following Body Attributes:
NOTE: The succes_url should look like this:
Where type should be one of PLAIN_TEXT or JSON, i.e. the format your endpoint can receive the transcript.
NOTE: And the fail_url should look like this:
Where you will receive as a plain text the error why your file could not be automatically transcribe.
The Vatis Tech POST method from above, will respond with a JSON with the following attributes:
Upload from public link and start the transcript
This is done in only one step, with the following HTTP request:
It has the same Query Parameters as the one above, and the same Body Attributes, with the fact that instead of the uid you will pass the following Body Attributes:
The response will be the same as the one above, with the same notes about success_url and fail_url.
Upload a file directly
This once again is done in only one step, with a HTTP request as follows:
With the following Parameters that can be query parameters or form data:
It will have the same response as the first method.
Conclusions
There are two main ways of automatically transcribing your media files using the Vatis Tech speech to text technology.
One way through the Vatis Tech Web Application, and one through the Vatis Tech API.
The Web Application is mostly used for users with a small amount of media files, while the API is best suited for those who want to fully automate their transcription process.
If you have any questions, please let us know at any of the bellow emails:
- emanuel@vatis.tech - Emanuel-Ioan Nazare, Web Developer @Vatis Tech
- support@vatis.tech - Support email @Vatis Tech